The Apple Push Notifications app enables scenarios to push notification messages to be sent to Apple’s Notification service. User-facing notifications on iOS devices communicate important information to users of your app, regardless of whether your app is running on the user’s device. For example, a sports app can let the user know when their favorite team scores. Notifications can also tell your app to download information and update its interface. Notifications can display an alert, play a sound, or apply a badge the app’s icon.
The delivery of push notifications involves several key components:
- Your company’s server, known as the provider server
- Apple Push Notification service (APNs)
- The user’s device
- Your app running on the user’s device
Push notifications begin with the provider server. When using the Apple Push Notifications app, Make becomes the provider server, and this is great because you don’t have to build or purchase your own provider server infrastructure. Most of the work is already built for you by Make!
You decide which notifications you want to send to your users, and when to send them. When it’s time to send a notification, you generate a request that contains the notification data and a unique identifier (“device token”) for the user’s device. You then forward your request to APNs, which handles the delivery of the notification to the user’s device. Upon receipt of the notification, the operating system and app on the user’s device handles any user interactions including the delivery of the notification to your app and what happens when the notification is tapped.
Here’s the overall architecture and a picture of where Make fits into the overall notification architecture:

Let’s take a look at a simple scenario that will manage and save device tokens to a Make data store. The main requirement of this scenario is to record the unique device tokens that are generated during the installation or reinstallation of an iOS app by the user.

In this case our iOS app has been designed to send a simple payload to a Make webhook to record a bunch of information about the installation when it is installed or reinstalled.
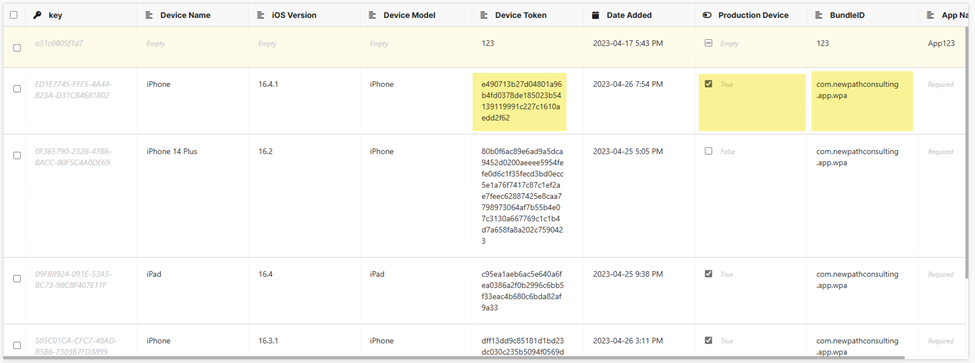
Here’s the datastore that is recording each device’s Device Token as well as some additional telemetry that can be used by other scenarios that use this data store. Of particular interest is the boolean flag, Production Device, that can decide whether this device is in production or a device used for testing. We will use this flag in our notification scenario. The BundleID column is the internal Apple app name that is setup when the app is compiled and submitted into Apple App Store Connect. The BundleID will also be used in our notification scenario.
The purpose of collecting the device tokens is so that when we decide to push a notification we can collect all tokens from a particular bundleID (ie iOS app) and send a notification to each device token, thereby targeting the installed app on a device.
The second scenario performs the actual sending of notifications to the Apple Push Notification service (APN). APN is a web service that accepts an authenticated request via an HTTP POST with a specific payload that defines the parameters of the notification.

This scenario accepts a web hook that defines the bundleID and various parameters of the the notification including the notification title, notification body. The datastore search then searches all device tokens attached to the bundleID, identifying valid devices that will accept the notification. Since the datastore has a flag for production and test devices the router branches between these so that we can control when to send only test notifications and when to send production notifications.
At the core of the scenario is the Apple Push Notifications app which just has 1 module, “Send a message”.
Acquiring the authentication key required to send notifications to APN
Each send message request requires a valid authentication key to be sent as part of the request. That key is generated with several details from the developer’s Apple App Connect account.
You must create a connection key for the Apple Push Notification app. Click Add button on the Send message configuration screen, and fill out the necessary details for creating a connection key for the Apple Push Notification app.

-
The private key is obtained from the developer account under the Keys section. You must create an APN key to be used for authentication. When you download the key make sure you save the .p8 file in a safe location as you can only download it once. You can generate a maximum of 2 APN keys but they can be revoked and regenerated if necessary. Upload the .p8 file and click Extract to extract the private key.
-
The preferred authentication method is Provider Authentication Tokens. These tokens are obtained from the Apple Developer account.
The Key ID appears when you click on the key to view its details

- The Team ID is always displayed in the Apple Developer account under your login in the upper right corner:

- Finally, you can specify whether this connection key is going to be a production key or a sandbox key. When testing you should click no on Production. You will need to specify a separate connection key when setting up for production notification services.
Configuring the Send Message module

The Recipients input is an array of device tokens with optional note on each token. Unfortunately the current implementation of the Send Message module does not allow mapping so notifications can be sent to a fixed number of devices right now. In our scenario we will use one operation for each device token.
The Topic input is the bundleID of your app. The bundleID is stored in the datastore for each device token so we can map this field to the datastore bundleID value.
The APS Data collection of the notification payload provides a way to send configuration information to the APN. One of the payload collections is called “alert” which sets various parts of the notification payload, but the Make Send message module hard codes the alert options for title and body. The module doesn’t allow other parts of alert to be set (eg “notification subtitle” cannot be set).
The configuration below sets the badge on the app icon to 1, specifies which sound to play when the notification arrives, sets the interruption-level and the relevance-score which are all parts of the APS dictionary.

The Custom data keys are the best way to configure information to be sent to your app for custom notification options. This data is passed unmodified to your app and the app can encode various options into your notification.
In the options below we have set the following parameters simply for illustrative purposes:
- customdebug will be implemented as a way to turn on debugging in our app so that information is recorded and displayed for debugging purposes when this key is set to true
- targetURL will be implemented to allow a URL to be loaded in the app when the notification is selected. Currently this is being received from the incoming webhook and mapped to this value.
- imageattachment will be implemented as a way to load a custom graphic in the notification option is an image URL is provided in the webhook payload.

Send notification option simply tells the APN whether to actually send the notification or suppress the delivery, which could be useful when debugging the payload received without actually sending the notification to the devices:

Finally, the Notification Title and Body are the 2 APS “alert” keys and values that can be sent in the current Send message module. The title and body are configured in the scenario to be sent as part of the webhook payload.
