Since last week, Google keeps asking me to verify. Before it was once a week, and now it’s once every few days. Also, I can’t seem to get my connections verified. I think to be able to not have to approve on your connection every week, you need to publish your app. But once I publish my app, at the end it asks me for some sort of YouTube video in which I show how to handle permissions or something. And obviously I think for the use case that I’m using Make for with a Google connection that’s not relevant.
Are there other people who actually verify their application using a free Google account, and if so, how did you manage to verify? It seems that they ask a lot of questions which are not relevant to this specific connection. I’ve already set all settings in the Google Cloud console, I also established a My HTTP OAuth 2.0 connection and and added lots of redirect URLs.
I’ve seen a lot of articles about this in the community, but I couldn’t quite figure out even with those articles what is the way to go here.
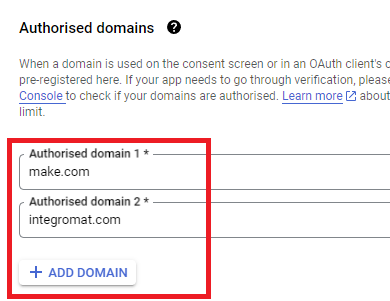
Here are some commonly-needed redirect URIs you need for your Google Cloud Console OAuth app. If you set these up, you can reuse the same GCP app for other Google apps and modules on Make.
You are also required to insert the legacy URLs below from the old Integromat system that not been migrated to Make yet (same as the above list, but replace “make” with “integromat”):
Note 1: Due to inconsistencies in Make’s implementation of the connections, there are two separate entries where has one is google and another ending in a forward slash google/ - you might need one or the other, so we have to use both!
Note 2: Once you’ve set these up, you can use/reuse the same Google OAuth App ID + Secret for all the supported Google connections and modules on Make - you’ll just have to enable the relevant Google APIs!
4. Create New Connection (HTTP, or respective Google module)
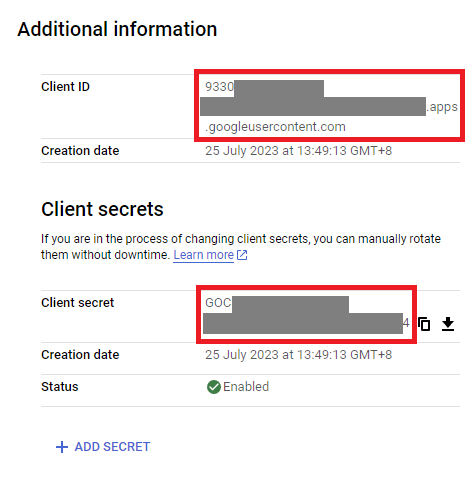
You can find the Client ID and Client Secret in the OAuth2 app you created in GCP, on the right-hand side of where you inserted the callback URLs in step 2: