Hey Makers
Welcome to this new tutorial about the new Make AI Toolkit and the the Make AI Content Extractor (Beta)!
Introduction
It follows the first Community Live Session where we showed you step-by-step how to build this use-case.
In order to make it more accessible, we decided to not use Airtable, but Google Sheet instead. This means that you can build it right-away, with a free Google Account, and also with a Free Make account ![]()
You will not build the scenario from scratch; we’ll let you import a blueprint that you will then modify step-by-step.

What do you need?
- You need a personal or professional Google account.
- Important: If you use a Personal Google account, you will have to do extra steps in order to allow Make to access it. The steps are described here.
- You need a Make organization, in any plan, including the Free plan.
- You will need a few images to test the scenario. But be careful! There are some limitations about the size of the images you will be able to use. Check here for more information about the maximum file size and pixels. Note that some modules accept bigger files, for instance “Generate Caption” can accept much larger images. But since we also use “Describe image”, let’s stick to its limits!
What are the prerequisites for the scenario to work?
We propose 2 scenarios for this use-case.
The first scenario uses the shared URL of the images. It only works if the images can be shared with their URL in Google Drive. The tutorial will show you how to share a folder and its files in Google Drive.
If you don’t want to share the images, it’s still possible with Make. In that case, you will use the second scenario. In this version, we tell the scenario to download the image first. (but in that case, the destination spreadsheet will not have a link to the image. All the rest will remain the same).
You will also need a new Google Spreadsheet, where all information will be stored.
Let’s do it!!
Step 1: create a new Google Spreadsheet
Go to your Google account, and create a new Google Sheet (go here).
Give it the name you want (and remember it for later). Add a first row, for the headers, with the following fields: Name, Long description, Short description, Contains human, Translation, File name, Link to image
It should look like the image below

Step 2: create the folders and import a few images
Go to your Google Drive here, and create a new folder. Give it the name you want. Eg: My Images
Sharing folder
Now, if you want to use the version of the use-case with shared URLs, you will have to change the Sharing settings of this new folder.
But:
-
If you don’t want to use this version and prefer that Make downloads the files. Or,
-
If you can’t share because of restrictions in your Google Account.
…then you can directly go to the next step Creating sub-folders.
To share the folder, click on the 3 little dots besides the name of your new folder, then select share, and then click Share.

Then for General Access, select All users with a Link. Like below (sorry for the French)

Creating sub-folders
Now it’s time to create the two sub-folders where we’ll move the images
Go inside your new “My Images” folder, and click on “New/New Folder”


Name the folder With Human.
Then do the same to create a second sub-folder called Without human.
It should look like this:

Importing images
Now, you will have to import a few files. These are the files that will be processed.
Find a few images, some including persons, some just with objects or animals. you can upload as much as you want, but the best practice is to limit to 4 or 5, for the tests you will do in Make.
Be careful of the limitations of some of the modules of the Make AI Content Extractor / Describe an Image. See here.
Your folder should look like this:

Step 3: Import the Scenario blueprint and configure it.
Now, you have created the relevant folders and sub-folders in Google, as well as created the Google Spreadsheet, you are ready to import and configure the Scenario.
Using the version with “Shared URLs”
If you managed to share the folder in Google Drive, then you are able to use the version that leverages these URLs. Download this file. You will use it later in Make.
Analyze and Classify images (with URL).json (64.7 KB)
Using the version with “File downloads”
If you didn’t share the folder in Google Drive, then, you will have to use the scenario that downloads the files before they are processed. You will use this file late in Make.
Analyze and Classify images (with Downloaded images).json (71.1 KB)
There are slight differences between the two scenario. The first one only finds the file and gets its shared url. The two initial Make AI Content Extractor modules use the shared URL of the images to analyze them. For the second version, we added a Google Drive / Download File module, and we changed the two initial Make AI Content Extractor modules to use the binary data that was downloaded.
All the rest is the same. When there is a difference, we’ll let you know.
Overview of the two scenarios
Version 1 (with Shared URLs):

Version 2 (with Downloaded files):

The second version has an extra step. And the two next modules are configured differently.
Importing the scenario
Go to Make, and then to Scenarios.
From here, click on +Create a Scenario.

And then, at the bottom of the screen, select the 3 little dots, and click on Import Blueprint

Choose one of the files you downloaded earlier [Analyze and Classify images (with URL).json or Analyze and Classify images (with Downloaded images).json]
Your new scenario should appear. It’s time to configure it.
Configuring the scenario
Watch Files in a Folder
Select the first module, and click Create Connection. IMPORTANT: if you use a personal Google account, you have to follow the steps here, and then copy/paste the clientID and ClientSecret provided by Google.
Once you have created the connection, you should see the following

Click on the string that starts with “1n80Jr”, and select your My Images folder (or whatever you called it).
It should look like this, depending on the name you gave to the folder and the location where you created it.

Click Save, and then All and Save again.

Download a file
This step is only if you selected the scenario version with file downloads.
Select the module, then select the Google connection you created for the previous module, and click Save.

It should look like this

Move to “With human”
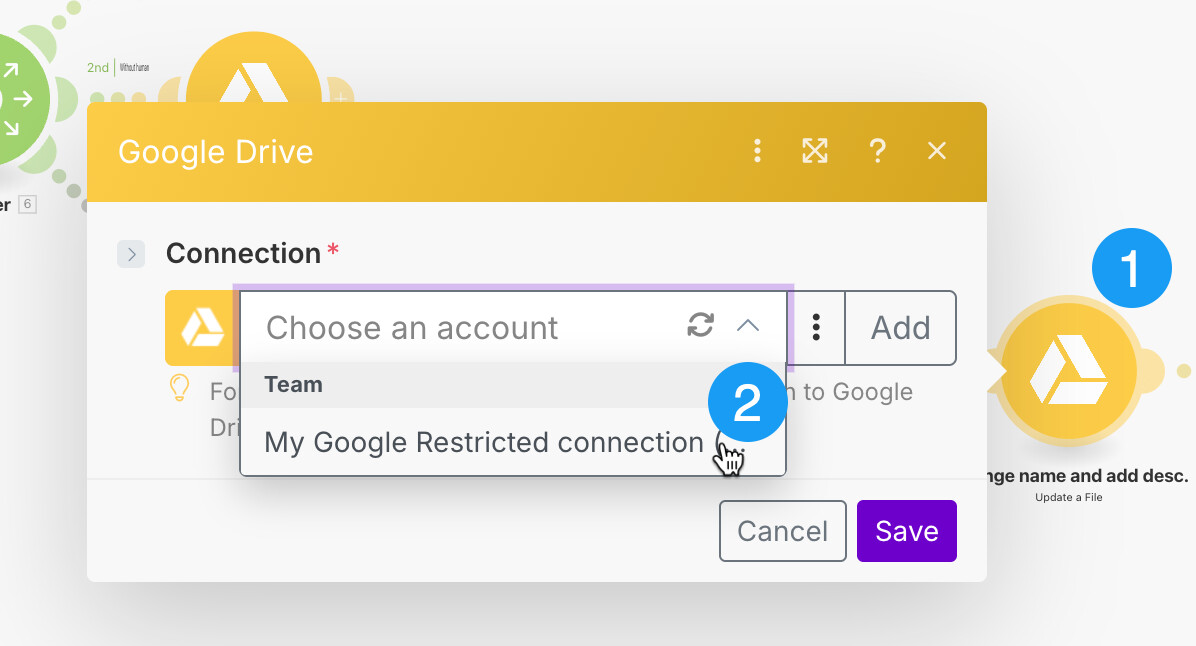
Now, select the Move to "With human" Google drive module, and click on Choose an account, then select the connection you created earlier.
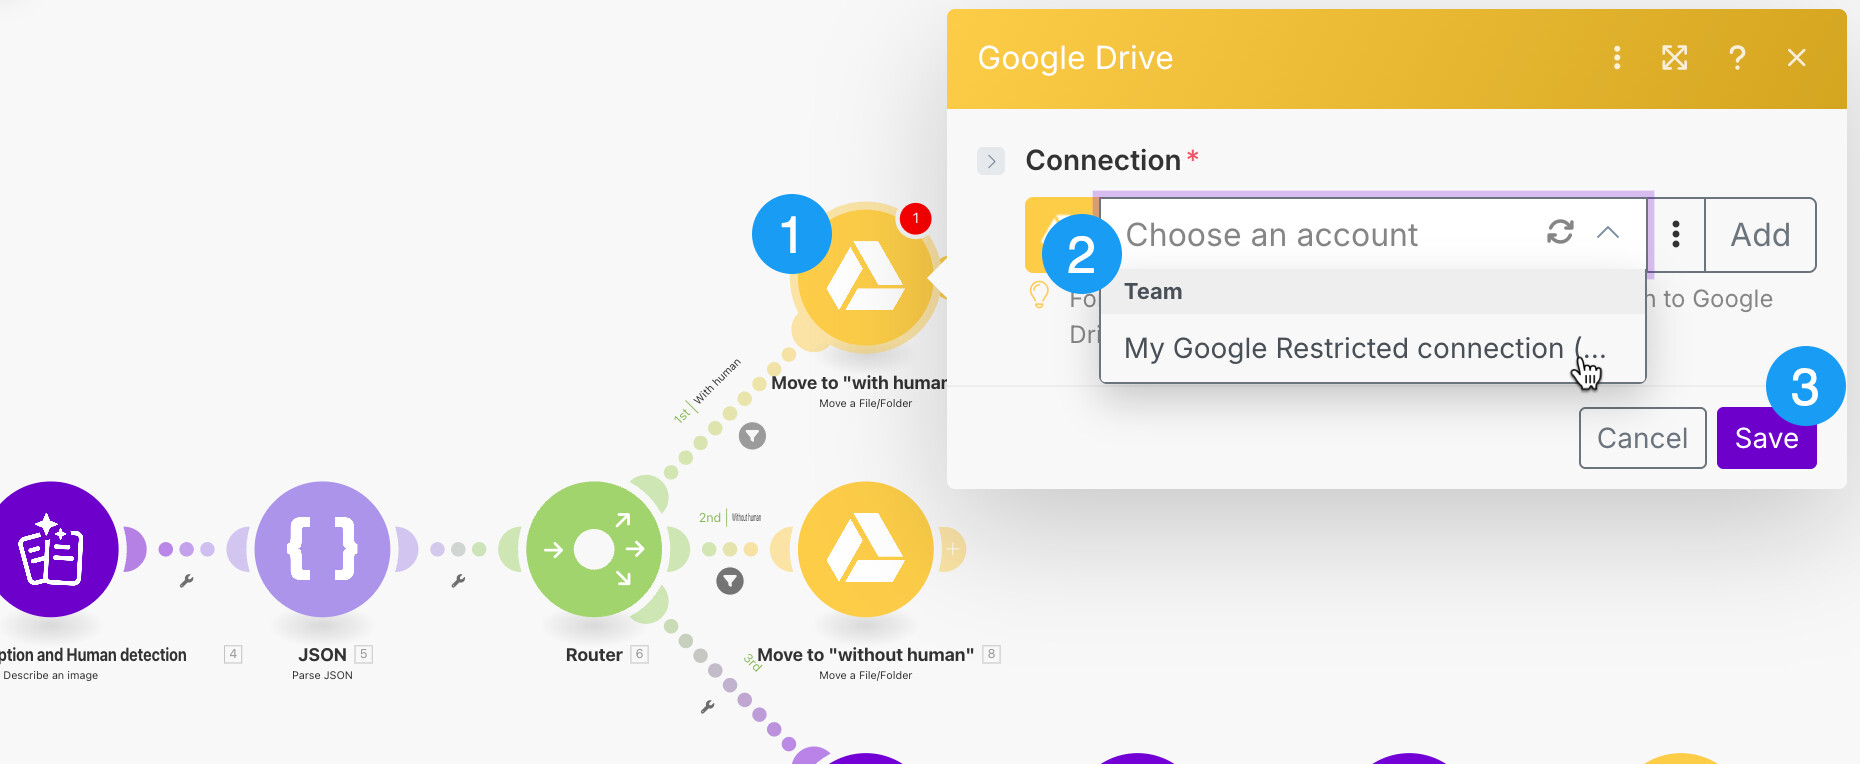
You will be asked to update the connection. Click Continue and follow all steps.

When the configuration page of the module shows-up, select the With human sub-folder, like shown below.

Move to “Without human”
Do the same for the Google module below. This time, it will not ask you to update the connection.
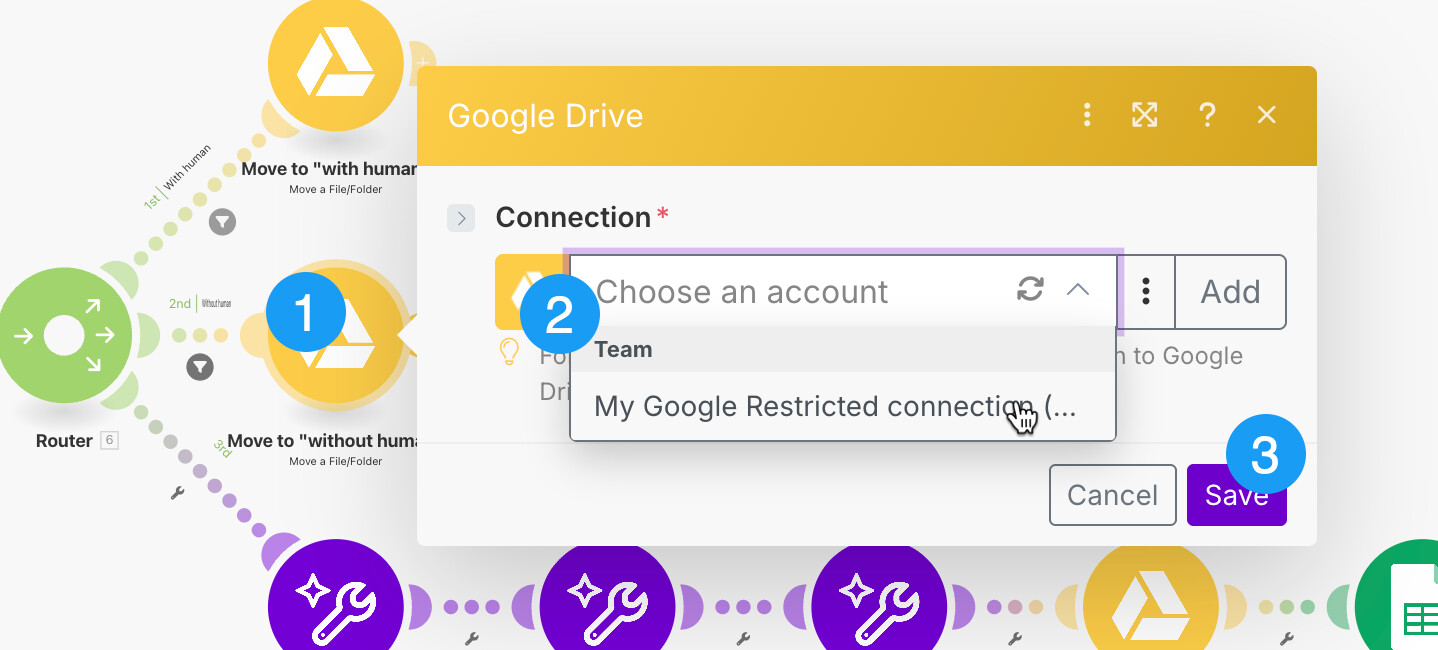
When the module shows-up, select the folder Without human.

Next, we will configure the connection for the three next Make AI Toolkit modules.
Summarize Text
Select the first one, and click Create a Connection.

In Connection type, select Make’s AI Provider. Note that if you are in Free or Core plans, you will not see the other options.

Click Save, and then click Save again to close the module configuration page.
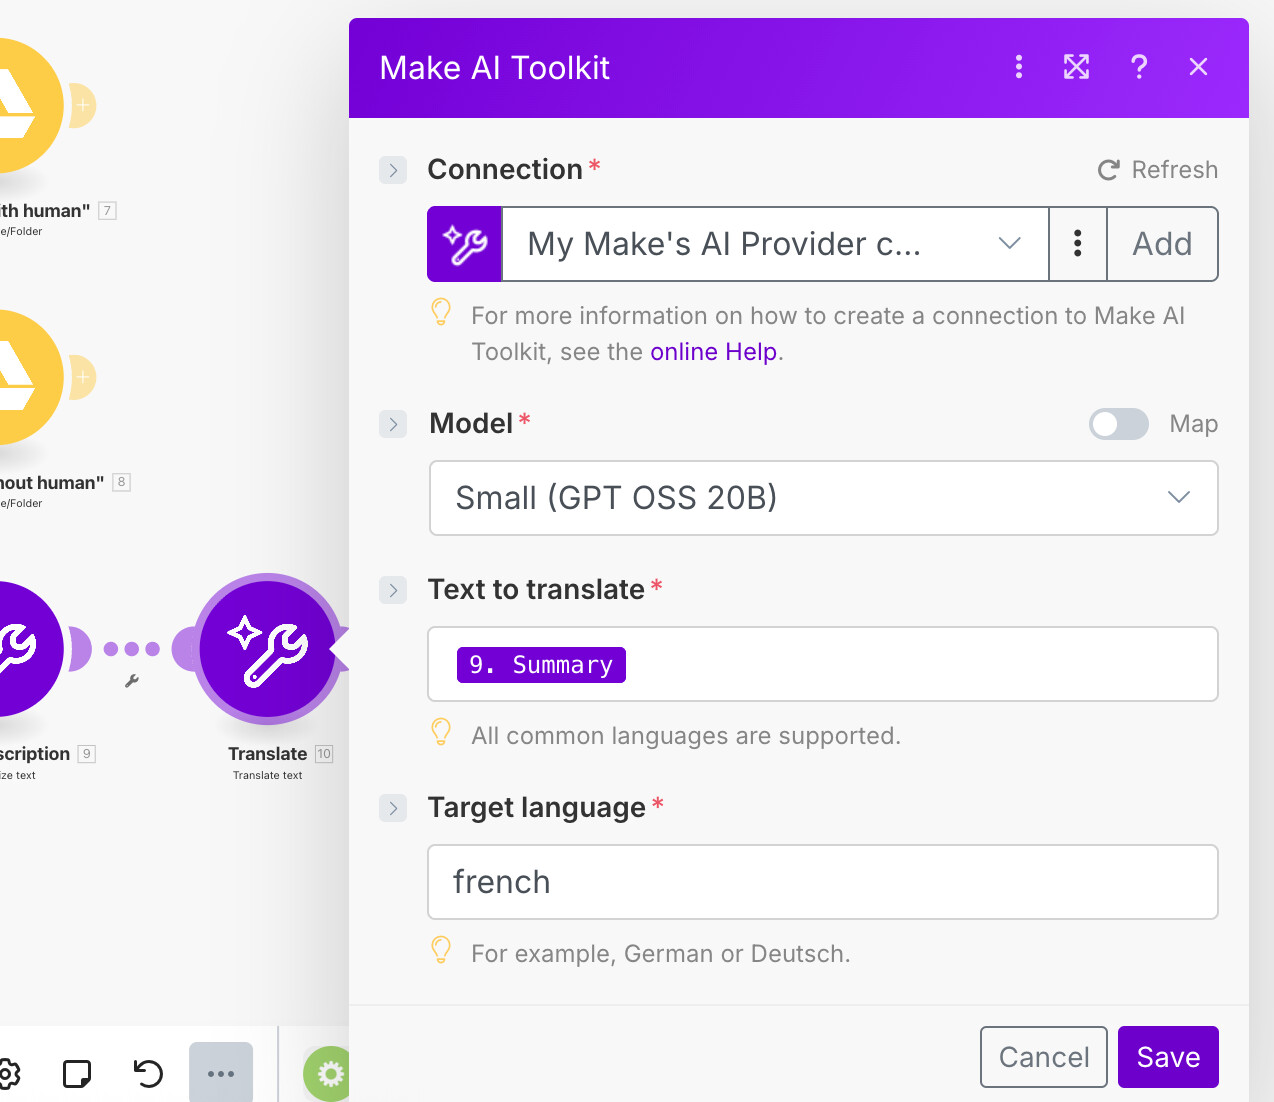
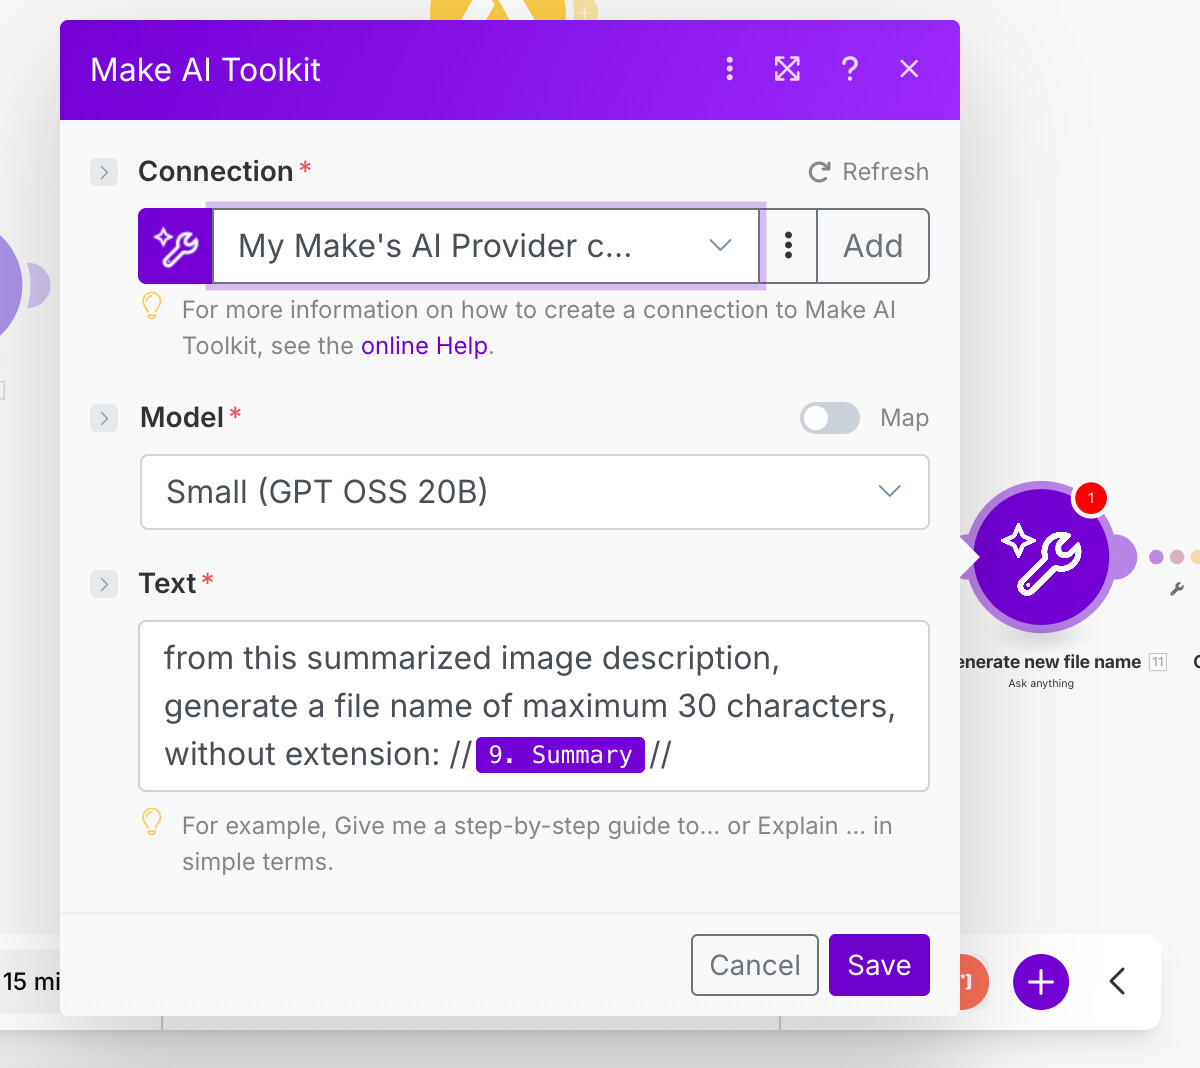
Translate Text and Ask Anything
Do the same for the two last Make AI Toolkit modules
Now, you will configure the last two Google modules.
Update a File
Once you have selected the connection, simply click Save.
Add a Row
For Google Sheet, open the module, click Create a connection and configure the connection. This one doesn’t require an advanced setting in Google.

When the connection is configured, go and select the Spreadsheet you created earlier, and then the sheet.

If you named properly the columns in your spreadsheet, it should look like this:

Note that you will notice, if you are configuring the version that Downloads Files, the column Link to image is different, since it can’t include the shared folder.
Step 4: Test the scenario
Now you are done configuring the scenario, you should be able to test it immediately.
Click on Run Once. If everything goes right, it should process a single image. Once the execution finishes, you should see a new row in the Spreasheet.

In Google Drive, one of the images should have moved to one of the sub-folders; it should be renamed and contain a description.
Step 5: Finalize the configuration, and conclusion
Now your scenario works, you can make a few changes to it:
- You can change the Limit in
Watch Files in a Folderto have it pick multiple files at once. - You can change the Prompt in
Describe an imageso that it detects different type of elements (eg: animals, cats, dogs, house, etc) and change the Route andMove Filemodules accordingly. - You can change the language in which the text is translated.
- You can add more AI Steps in order to analyze further the images.
You can also schedule your scenario and make it active so that it regularly checks for new images.
This example is a simple use-case that shows a few Make AI Apps modules; things could be done differently, according to your specific use-case. We hope you enjoyed!!!