My Journey to Master Make.com - Week 2 Adventures

Hi All,

I wanted to share my progress after week 2.

I completed another Make Academy course, Make Basics.

https://academy.make.com/bundles/make-basics

I earned my second Make Badge via Credly.

https://www.credly.com/badges/75956ad6-11e8-428c-98b1-8dc9d6678ace/public_url

The Make Community is excellent, my questions are answered super fast!:rabbit:

The following are some interesting things I learned during the week.

# Google App Connections

When using the Google Sheets App you will be asked to make a connection

Google connections need to be reauthorised every 7 days for free Google accounts. Gmail business accounts do not need to be reauthorised. If you change the password on any linked account, you will also need to reauthorise.

# Disabling Routes

You can disable a route by right clicking on the link between modules and click ‘Disable route’.

This is useful when testing your scenario because it allows you to save operations.

# Date and Time

When working with date and time, try to use ‘now’ as this will always give you the full date and time in GMT to the millisecond.


# Functions

I was using the formatDate function. I had the following which did not work

functions-1

After a few minutes of :exploding_head: I figured out what was wrong. There was a space in front of ‘America…’. This was easier to notice after I copied the function code into a text file.

functions-2

After I removed the space my scenario worked as expected.

# Scenario Inputs

I was looking at the unanswered questions in the make community to see if I could help anyone. I saw a question and wanted to create a scenario to mimic what they were asking about.

To have some input data I decided to use Scenario inputs

I then wanted to use this data in the Tools Set variable module and to my surprise I could not find a way to access it :thinking:. When I clicked into Variable name there was no popup dialog allowing me to map the scenario input data that I had just created.

I posted a question in the Make Community and within a few minutes I had an answer! You have to click the { } to access Custom and system variables. However I had to run the scenario first before my scenario input ‘name’ showed up.

# Tools Basic Trigger

Following on from Scenario inputs where I was trying to find an easy way to have some sample data for my scenario I came across Basic Trigger when doing the Make Academy Basics course. This is really nice as you get a starting module for your scenario while also being able to generate a bundle with whatever data you want.

# Removing a Filter

You can add filters by clicking the link between two modules and setting the filter conditions. To my surprise the way to delete the filter was not obvious at first. I thought I would be able right click and delete, or open it up and there would be a delete button. The way to delete the filter is to open it up and remove each of the conditions that you have added.

So another week of my Make journey complete :party_popper:. Learned a lot and looking forward to learning a lot more. Will continue to make notes of any of my head scratching moments and write about them here :slightly_smiling_face:

1 Like

Personal (non-Google Workspace) accounts.

You can simply set your GCP app to “Production” to avoid having to reauth every week.

Follow this main guide on how to set up a custom OAuth 2.0 custom app in Make.

Provided below are additional supplementary instructions in case the above isn’t clear enough.


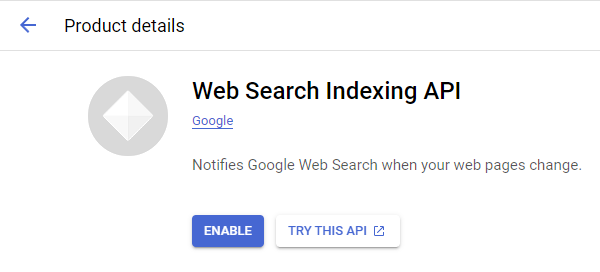
Enable APIs

1. Enable the relevant APIs that you want to use

Search for the relevant Google API here: https://console.cloud.google.com/apis/library

  • Go to each API page that you want to use, end click “Enable”

  • Usually you’ll want to enable at least Drive (includes Docs/Sheets) and Gmail.


OAuth Client

Direct Link: https://console.cloud.google.com/apis/credentials

2a. Create “OAuth client ID” Credentials

2b. Insert all the Google Redirect URIs for your app

Google Redirect URIs

Here are some commonly-needed redirect URIs you need for your Google Cloud Console OAuth app. If you set these up, you can reuse the same GCP app for other Google apps and modules on Make.

https://www.make.com/oauth/cb/oauth2
https://www.make.com/oauth/cb/google
https://www.make.com/oauth/cb/google/
https://www.make.com/oauth/cb/google-custom
https://www.make.com/oauth/cb/google-restricted
https://www.make.com/oauth/cb/google-cloud-speech
https://www.make.com/oauth/cb/google-search-console
https://www.make.com/oauth/cb/google-analytics-4
https://www.make.com/oauth/cb/google-ads2
https://www.make.com/oauth/cb/google-ads2/
https://www.make.com/oauth/cb/youtube
https://www.make.com/oauth/cb/chrome

Note: Due to inconsistencies in Make’s implementation of the connections, there are two separate entries where has one is google and another ending in a forward slash google/ - you might need one or the other, so insert both!

Note: You are also likely required to insert the legacy values below from the old Integromat system that might not have been migrated to Make yet (simply the above list, but replace make with integromat)

https://www.integromat.com/oauth/cb/oauth2
https://www.integromat.com/oauth/cb/google
https://www.integromat.com/oauth/cb/google/
https://www.integromat.com/oauth/cb/google-custom
https://www.integromat.com/oauth/cb/google-restricted
https://www.integromat.com/oauth/cb/google-cloud-speech
https://www.integromat.com/oauth/cb/google-search-console
https://www.integromat.com/oauth/cb/google-analytics-4
https://www.integromat.com/oauth/cb/google-ads2
https://www.integromat.com/oauth/cb/google-ads2/
https://www.integromat.com/oauth/cb/youtube
https://www.integromat.com/oauth/cb/chrome

Note: Once you’ve set these up, you can use/reuse the same Google OAuth App ID + Secret for all the supported Google connections and modules on Make - you’ll just have to enable the relevant Google APIs!


OAuth consent screen

Direct Link: https://console.cloud.google.com/apis/credentials/consent/edit

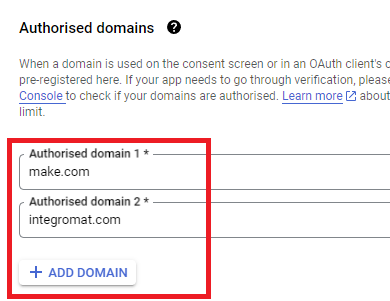
3a. Insert Two Authorised Domains

  • Insert make.com and integromat.com

  • Fill in other required fields

  • Click “Save and Continue”.

3b. Add All Scopes

  • Click “Add or Remove Scopes”

  • Select 100 “Rows per page”, for each page, check all the rows, OR

  • Manually type in the scopes you need

  • Click “Update” at the bottom

3c. Step through and go to dashboard

At the last step/page, click “BACK TO DASHBOARD” instead of “Prepare for Verification”

3d. Publish your GCP OAuth2 app

You will need to set your OAuth application to “Production”, otherwise the credentials expire very frequently.


Create New Connection (HTTP, or respective Google module)

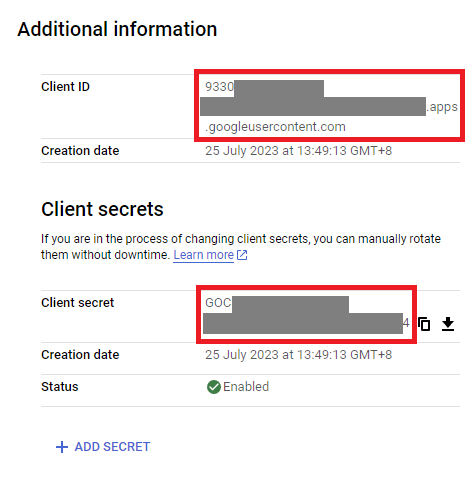
You can find the Client ID and Client Secret in the OAuth2 app you created in GCP, on the right-hand side of where you inserted the callback URLs in step 2:

4a. Specific Google module (Sheets, Docs, Drive, Gmail, etc.)

Insert the GCP app client ID and secret here BEFORE clicking “Sign in”

(Gmail example)

OR,

4b. HTTP OAuth 2.0 Request module

You need a “Authorize Parameters” key of redirect_uri with the above Make OAuth2 callback URL.

Hope this helps! Let me know if there are any further questions or issues.

@samliew

P.S.: Investing some effort into the Make Academy will save you lots of time and frustration using Make.

If you only need ONE bundle, the “Set Multiple Variables” module work the same way.

If you know some JSON, you could even begin the scenario with a “Parse JSON” module.

Hope this helps! Let me know if there are any further questions or issues.

@samliew

P.S.: Investing some effort into the Make Academy will save you lots of time and frustration using Make.

1 Like

Good morning, thanks for such a detailed reply! Good to know :slight_smile: