I have been working a scenario that will watch for new WordPress posts and submit them to Google Indexing API so they can be crawled.
To me, Google’s API documentation is a hot mess but I did make some progress but stuck with the error relating to a redirect issue even though I have added it as an authorized redirect uri in the developer console.
I’m using https://www.googleapis.com/auth/indexing for the scope. I also went ahead and added the url you provided, still getting the same error but Google states it could take a few hours for the change to take affect.
Quick update as I figured I gave it enough time after making the change in the dev console. Still getting the same redirect error referencing the same uri “redirect_uri=https://www.integromat.com/oauth/cb/oauth2”
Hey @Tim_B , your original redirect URL was correct. So keep using https://www.integromat.com/oauth/cb/oauth2
Did you read Using OAuth 2.0 for Web Server Applications for the oauth setup? It seems like your authorize URL is not fully correct?
I believe it shoiuld be https://accounts.google.com/o/oauth2/v2/auth
I ended up creating a new client ID and got further when adding the redirect url to the authorized list but now I get the following message since I don’t own the domain.
integromat.com has not completed the Google verification process. The app is currently being tested, and can only be accessed by developer-approved testers. If you think you should have access, contact the developer.
Here are all the known redirect URIs you need for your Google Cloud Console OAuth app. If you set these up, you can reuse the same GCP app for other Google apps and modules on Make.
Once you’ve set these up, you can use/reuse the same Make connection for all the supported Google apps & modules on Make - you’ll only have to enable the respective APIs for your custom app in Google Cloud.
According to the Make OAuth2 documentation, the main one you need to use for HTTP OAuth connection is
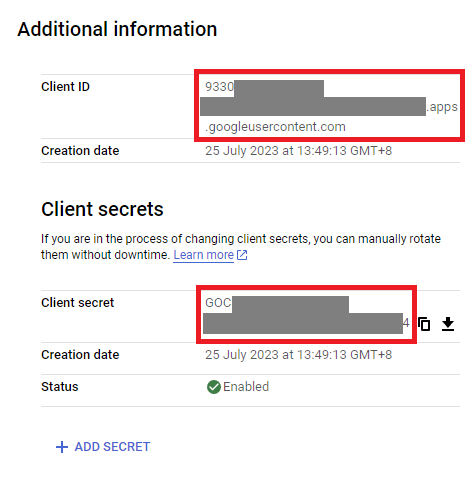
You can find the Client ID and Client Secret in the OAuth2 app you created in GCP, on the right-hand side of where you inserted the 8 callback URLs in step 2:
1. If you have a new question in the future, please start a new thread. This makes it easier for others with the same problem to search for the answers to specific questions, and you are more likely to receive help since newer questions are monitored closely.
2. The Make Community guidelines encourages users to try to mark helpful replies as solutions to help keep the Community organized.
This marks the topic as solved, so that:
others can save time when catching up with the latest activity here, and
allows others to quickly jump to the solution if they come across the same problem
To do this, simply click the checkbox at the bottom of the post that answers your question:
3. Don’t forget to like and bookmark this topic so you can get back to it easily in future!